
In this article, we explain how to create, place, and remove a Website Widget Legacy.
Note: This article is about our 'old' Website Widget. It is not supported for new features or bug fixes.
Creating a New Website Widget Legacy
- Log in to Watermelon.
- Navigate to "Integrations" through the menu.
- Go to Channels and click on the plus sign next to "Website Widget Legacy". Tip: If you have many channels linked, select Channels in the left menu first.
- Click on "Create a new Website Widget" at the top of the page.
Next, you can personalize your Website Widget!
Website Widget settings
- Give your Website Widget a name visible to the customer.
- Assign a status to your Website Widget, displayed below the name.
A status message is visible at the top of the chat screen and provides information about your organization. For example: "Our chatbot is available 24/7! Our colleagues are available Monday to Thursday from 08:00 to 18:00 and on Friday from 08:00 to 17:00. 💬"
Welcome Message settings
The welcome message is the first message the visitor will see in your Website Widget. Expand the Welcome Message menu to set this up.
You can use a welcome message to greet the visitor and invite them to ask a question or specify the types of questions that can be answered in the chat. For instance, if you have an active chatbot on this channel with a start button underneath, you can choose "Click the button below to ask a question."
If you want the welcome message to also appear above the Website Widget icon, you can choose to enable the eyecatcher. This eyecatcher attracts the attention of your website visitor, increasing the likelihood of your Website Widget being opened. Activate this by toggling the switch under Eye-catcher settings. You also have the option to choose not to display the eyecatcher on mobile.
Change Icon
Here, you can choose how you want the Website Widget to appear on your website. You can add a personalized icon or choose from our standard icons (square or round). The uploaded icon can be a maximum of 500 by 500 pixels. You can upload jpg, png, and gif files, with a maximum size of 1 MB.
Personalise
Under personalise, you can adjust the Chat Widget to match the color of your branding. The main color is reflected in the company name, chat window, text bubbles, and buttons. We recommend keeping the background color light for readability. You can enter the hex code of your company colors.
Under Watermelon branding, choose whether the "Powered by Watermelon" watermark is visible in your Website Widget.
In the Typebar placeholder, choose the text visible in the type bar before someone starts typing. For example: "How can we help you?"
You can change the icon and customize the Website Widget in the Business, and Enterprise packages.
Language
Under Language, choose the language for Website Widget information, such as time indications and the calendar. This language is visible to customers.
View Code
Under View Code you will find the code to place on your website to make the Website Widget visible. Read below on how to place the code.
Placing the Website Widget
When you want the Website Widget visible on your website, the code can be found and copied as described above.
Note: Do you not manage your own website? Send the code to your website administrator. The website administrator can easily place the code on the website.
Placing the code via Wordpress
- Open your Wordpress environment.
- In the Dashboard navigate to Appearance.
- Go to Theme editor.
- In the Theme files, look for the Theme Header file (header.php).
- Paste the earlier copied code after the <head> tag.
- Click on Update file. Your website widget is now added to your website.
If you can't access the header.php, or if you cant place the code, paste the code then in functions.php.
Using Wordpress plugin
- Download the Watermelon plugin in the WordPress Plugin Store. You can do this by going to Plugins in WordPress. Click on New plugin. Type "Watermelon" in the search bar. You can also download the plugin here.
- After downloading you have to activate the plugin in your WordPress account. Go to Plugins again. Now choose Installed plugins. Search for the Watermelon plugin and click on activate.
- Click on the Settings of the Watermelon Plugin under Installed plugins. Here you can enter the key. You can get the Watermelon key from your previously copied code from your website widget. See the bold code in the example below. Enter this Watermelon Key into your WordPress plugin and the website widget is linked!
Do not use the code below, this is an example!
<script type="text/javascript">
window.Watermelon = window.Watermelon || {};
window.Watermelon.key = "place your own key here";
window.Watermelon.toggled = false;
(function(d,s) {
s = d.createElement('script');
s.type = 'text/javascript';
s.async = true;
s.src = "https://wm-livechat-2-prod-dot-watermelonmessenger.appspot.com/assets/js/wm_plugin.js";
d.getElementsByTagName('script')[0].appendChild(s);
}(document));
</script>
Placing the code in Lightspeed
If you want to place your website widget through Lightspeed, you can follow the steps below:
- Log in to your Lightspeed eCom using your login credentials.
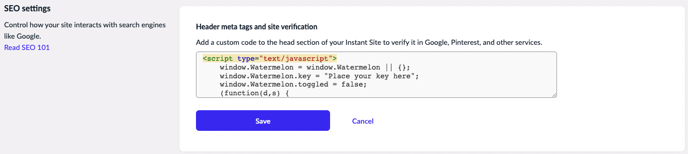
- Navigate to the menu on the left and go to Website, then SEO.
- Next, go to Header meta tags and site verification. Enter the code here and click 'Save'.
- Your website widget has now been added to your website!
Placing the code via Google Tag Manager
If you use Google Tag Manager, this article explains in 7 steps how to place your Website Widget via Google Tag Manager.
Removing the Website Widget
If you want to remove the Website Widget, click on "Remove Website Widget" at the top of the page for the relevant Website Widget. The Website Widget will no longer be active, and your data will be lost. Make sure to also remove the code from your website.