
How nice would it be if, when your website visitors come back for the second time, they are greeted differently by your chatbot? In this article, we explain how you can easily set this up.
What do you need to realise this?
- A Premium, Business or Enterprise plan
- A paid Zapier account
- A start button in your conversation
Let's get started!
The first step we need to take is setting up our conversation with the start button in a way that the chatbot can greet the visitor again. To do this, we need two new custom fields.
The first custom field we'll create is one that will cause a welcome-back message to be filled in. Follow the steps below:
- Go to settings and click on custom fields;
- Create a new custom field. Read how to do it here;
- Give this custom field a recognisable name. For example 'Fill in for welcome back message';
- Set the field type to 'Long text', and the 'Unique' dropdown to 'No';
- Next, you create the second custom field. This custom field is used to place the 'welcome back message'. Give this field also a recognisable name, for instance 'Welcome back message';
- Set the field type to 'Long text', and the 'Unique' dropdown to 'No' as well.
Now that we have created the custom fields, it is time to customise the conversation with the start button. Follow the steps below:
- Select the conversation with the start button (identified by the star in the top right corner) or create a new conversation and add the start button to it;
- Decide in which text module you want to welcome the visitor. This could be the first text module right after someone clicks the start button.
- Place the custom field 'Welcome back message' behind the text in the text module.
Time to fill in the custom field 'Welcome back message'. This works as follows. The first custom field we created in the previous step, 'Fill in for welcome back message', has to be filled in automatically to give the signal that the second custom field, 'Welcome back message', is also filled in. This can be done in various ways.
The easiest way is to have the custom field filled in automatically as soon as someone clicks a button from the conversation below the start button. It is important that all buttons in the start conversation are filled in. Otherwise, you can only welcome the visitor again when someone clicks one specific button. Follow the steps below to build this:
- Select the button that should automatically fill the first custom field;
- Click the circle with the arrow that appears below it. Please note! This is only possible if there is nothing under the button;
- Then select 'Fill custom field automatically'. A field will now appear below the button;
- Select from the dropdown menu the custom field 'Fill in for welcome back message'.
This can also be done with all other 'Responses' modules.
Setting up Zapier
Everything is now set up correctly in the Watermelon platform. Time to make sure it works in Zapier too.
- Open your Zapier account and click 'Create zap';
- Search for the app 'Watermelon' and select the app;
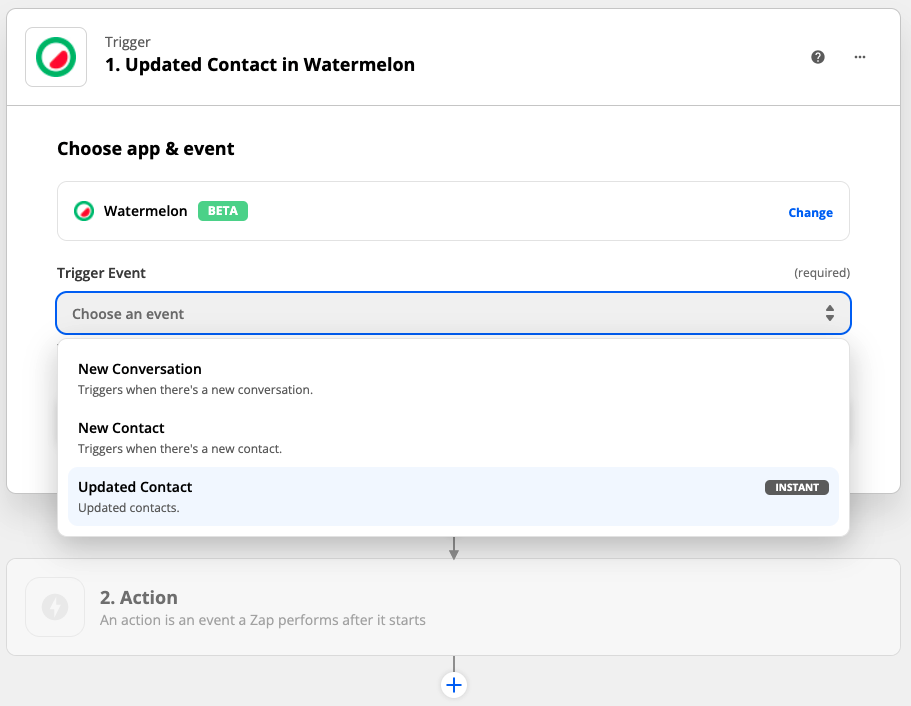
- Under 'Trigger event', select 'Updated contact';
- Next, select your Watermelon account. If you haven't set this up yet, read here how it works;
- Test the trigger and click on 'Continue'.
For the action we set up a filter. This is necessary to make sure the Zap only works when the field 'Fill in for welcome back message' is filled in. We want to prevent the visitor from immediately seeing a welcome back message. Follow the steps below to continue:
- Click on 'Filter' (right side, second option);
- Under 'Filter setup & testing', select the 'Fill in for welcome back message' custom field at Choose field. Don't see the field? Then you can search for it or click the 'Show all fields' button;
- Then click on 'Choose conditions' and select the option 'Exists';
- Click on 'Continue'. Now it will say that the zap would not have taken place. That is correct, because this field has not yet been filled in for the test contact.

Time to set up what should be in the welcome message. Follow the steps below:
- Click on the blue plus sign to add the last action;
- Search for the app 'Watermelon' and select it;
- At Action event, select 'Updates an Existing Contact';
- Click on continue and then select the same Watermelon account you used at the start of this zap. Click on continue again;
- Go to Contact id and click on the dropdown. Select 'Custom' and click on 'Updated contact in Watermelon'. Now a menu opens, select 'Contact's id'. Zapier will now find the right contact in Watermelon to fill in the custom field 'Welcome back message';
- Scroll down until you find the custom field 'Welcome back message'. Here you enter the text that you would like to show when a visitor returns. You can also add other custom fields in this field. This way, you can personalise the welcome back message with the visitor's first name, or the subject the visitor has selected in the chatbot. The possibilities are endless;
- Then click 'Continue' and 'Test & continue'. After the test has been completed successfully, you can switch on the zap and test it!
Congratulations! Your chatbot can now successfully greet returning customers with a special 'Welcome back' message!